Total Pageviews

Friday, September 20, 2013

How to Kill an App in iOS 7

It's almost the same as before,  just a tad faster:
  1. Double click the home button
  2. Swipe to the troublesome app
  3. Swipe it up an out of there!
And that's that!

Hopefully this saves you some frustration when switching to iOS 7 and you're wondering, "What the heck? I can't kill a troublesome app anymore!?"

Yes, yes you can.

Wednesday, September 04, 2013

Updating Python Scientific Computing Environment on Mac OS 10.8

Upgrading an OS is simultaneously awesome and terrifying. Awesome because you are about to get your hands on what, hopefully, will be some fantastic new features! Terrifying because the upgrade will likely break a lot of software on your system, especially development tools.

Ooo, I'm intrigued! But is it safe?
(image from here)

In my case, I had a pretty good feeling the upgrade from Snow Leopard to Mountain Lion would break many parts of the python scientific computing development environment running on my system. Fortunately, I was going take a hiatus from that kind of development for a while. When I finally picked it back up, everything was working fine, surprisingly! But then I needed to update Pandas and iPython...

My development environment was built using Homebrew and pip. It's got python, zeromq, numpy, scipy, matplotlib, cython, pandas, ipython, and qtconsole. If you are looking to create an the environment from scratch, check out this article. It's pretty good. At some point I'll write up what I did. This article focuses on updating your installation.

Happy Path to Updating


My particular installation has a few more packages installed. So, there are more updates that need to occur. Note that when doing some of the upgrades via pip, other upgrades may get automatically triggered. For instance, upgrading matplotlib will likely upgrade tornado; therefore, you would not need to do so explicitly.
  01  brew update                             # update brew itself
  02  brew upgrade                           # update all installed packages
  03  pip list                                     # list installed pip packages
  04  pip install --upgrade numpy
  05  pip install --upgrade scipy
  06  pip install --upgrade matplotlib   # will likely update tornado for you
  07  pip install --upgrade cython
  08  pip install --upgrade pandas
  09  pip install --upgrade pyzmq
  10  pip install --upgrade pygments
  11  pip install --upgrade ipython      # repeat 'til latest version is installed
  12  pip list
  13  ipython qtconsole                    # test ipython in the GUI
  14  ipython                                   # test ipython in the terminal

Errors Updating Homebrew


Now, it is very likely that the happy path did not work so smoothly (ah, gotta love updates). Firstly, you may have encountered issues with updating homebrew. Oh I don't know, maybe you saw something that said error: unable to unlink old '.gitignore' (Permission denied), and several more like it. It kinda looks like this:


Or maybe you got some error stating that Your local changes to the following files would be overwritten by merge. See my post on Updating Homebrew Woes for tips on dealing with various issues. I am going to be brief here. The following commands should solve your Homebrew issues, and you can start on the happy path again.
  01  brew doctor
  02  sudo chown -R $(whoami) $(brew --prefix)
  03  cd $(brew --prefix)
  04  git fetch origin
  05  git reset --hard origin/master
The brew doctor command will tell you nearly everything that is wrong. Listen to the doctor and do what she says. The chown command will make sure you, the local user, owns the directory in which brew lives. The last three will reset your brew installation to the master branch (so, if you did actually make local changes, you may want to commit them).

Errors Updating PIP Installed Packages


You may have, or will, encounter numerous issues here. Some of them will result from not having updated Xcode and/or Command Line Tools for Xcode (see Updating Homebrew Woes for details). Here are a few errors you may encounter and solutions:

       error: /usr/include/zlib.h: No such file or directory

          ➜   install/update Xcode and/or Command Line Tools for Xcode

       src/_png.cpp:23:13: fatal error: 'png.h' file not found

          ➜   brew install libpng

       various errors installing matplotlib

          ➜   brew install freetype
          ➜   brew install libpng


Nifty Tools


The brew outdated command will list all installed packages that have available updates. So, you can use this command to estimate how much updating you will be doing, and how much time you might have to devote to this endeavor.

Unfortunately, pip does not have a similar command. However, Artur Siekielski wrote a script that can tell you what pip packages are up-to-date or have available updates. I have not used the script, but it could be handy.

References + Links

Installing Scientific Python on Mac OS X
Updating Homebrew Woes
Homebrew Troubleshooting
Homebrew FAQ
Script to Check for Package Updates on PyPi

http://pandas.pydata.org/
http://ipython.org/
http://brew.sh/
http://www.pip-installer.org

Tuesday, September 03, 2013

Tips for the Updating Homebrew Woes

Sometimes you run into something that requires you to update your installed packages. And then... you groan. Why? Because you know that once you attempt to update something, a gigantic can of worms will BURST open. Aaaand you know you are about to sink 3-5 hours updating packages, fixing dependencies, the whole nine.


To update brew and installed packages, you usually should only have to do the following commands (1):
1  brew update    # updates brew itself
2  brew upgrade  # upgrades all brew installed packages to latest versions
If you are lucky that day, it will work without a hitch! If not, here are some tips:

0.  The doctor is your best friend


Issue the "brew doctor" command. The doc will tell you what's wrong. Heed the doctor's orders and it will go a long way to reduce frustration.

1.  Make sure your brew --prefix directory is owned by you


At some point, something will mess with the ownership and permissions on this directory (typically /usr/local) and brew will be unable to write to it. The following command will usually remedy the problem (2):
1  sudo chown -R $(whoami) /usr/local
This command will run as super user and recursively change ownership of that directory and its contents to you, the local user.

2.  A hosed brew installation should be reset


Your brew installation may just be completely screwed from the onset. For instance, when you attempt a brew update you may get an error stating (among other things) that "The following untracked working tree files would be overwritten by merge." In this case, reset your brew installation to the master (3):
1  cd $(brew --prefix)
2  git fetch origin
3  git reset --hard origin/master

3.  Update your Xcode installation and/or Command Line Tools for Xcode (CLT)


Homebrew depends on stuff Xcode/CLT installs. Other packages Homebrew installs depend on stuff Xcode/CLT installs. Updating it is usually a good idea. If you do this by installing Xcode, you still have to do a few more things:
  1. Install Xcode from the App Store
  2. Launch Xcode
  3. Accept the License Agreement (most important step, otherwise Xcode is a dud)
  4. Go to Preferences > Downloads
  5. Install/Update Command Line Tools
If you see a message like "error: /usr/include/zlib.h: No such file or directory" when brewing, that usually means you didn't do steps 2-5 listed above. Get at it.

I hope these tips save some of you a bit of time and hours of your life back!

Sources / References

1. Homebrew FAQ
2. Homebrew Troubleshooting
3. Reverting to Master Branch

Good Links

Homebrew Troubleshooting
Homebrew and Python
Homebrew Homepage

Saturday, July 13, 2013

Programming Comcast XFINITY Remote to Logitech Z-5500 Sound System

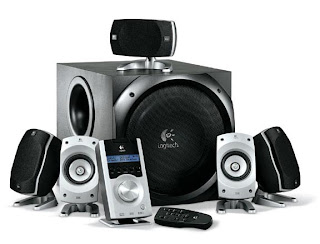
Straight up BOSS sound system
Let's paint the scenario. You have a sound system that is straight up BOSS. It even boasts an optical cable for even more crisp sound. Your TV is this pristine flat screen that can play high definition media like nobody's business. Not to mention, this TV of yours also has plenty of HDMI ports so you can hook up just about anything: XBOX, PlayStation, ROKU, and more! And you just got Comcast XFINITY and all of its HD offerings. Sweet.

Exhibit "A"
But... you now have a plethora of controllers with which to contend. And if you have housemates... fahgettaboudit. They will be so confused and frustrated, you will have no hope of survival. There will be no end to the grief they give you. And who wants house drama? So, you opt to consolidate all functions into a single controller. However, you are too cheap to buy an awesome universal remote... because the Comcast XFINITY remote IS a universal remote (see Exhibit "A").

Great. Now you get to the business of setting up the controller. TV gets programmed easy; no issues there. Then you get to your Logitech Z-5500 Sound System. Aaaaaand that Comcast remote can't recognize it. Not only is there no manufacturer code printed on the controller's user guide, but using the controller to search for your code comes to no avail. Now what?

Enter secret codes. You'll have to manually program XFINITY remote and map the buttons to the functions you want. Here is the play by play:

Eligibility
  1. Do you have patience?
  2. Does your controller look somewhat like exhibit "A"?
If you answered yes to those questions, you might just be in luck.

Test Case: Program the Power button

We are going to try to program the power button. If we can do that, then you have carte blanche.

Set the controller's AUX mode to accept programming
  1. Press and release AUX
  2. Press and hold SETUP until the AUX button blinks twice
  3. Enter code 11523
  4. The AUX button should blink twice in confirmation
  5. Repeat if step 4 did not happen
Program the Power button to toggle the Logitech Z-5500 system's power

Make sure the logitech system is powered on prior to completing these steps. Also make sure that you point the Comcast controller at the Logitech infrared receiver when entering commands.
  1. Press and release the AUX button
  2. Press and hold SETUP until the AUX button blinks twice
  3. Enter code 9 9 4
  4. Press and release SETUP
  5. Enter code 44485
  6. Press and release the POWER button
  7. The AUX button should blink twice in confirmation
Now, attempt to toggle power on the Logitech sound system. If you can't manipulate power with the controller, attempt to program it again with the above steps. If after a few tries there is no dice, sorry to say but you are SOL. But if it DOES work, read on friend!

Heavy Lifting: Program the rest of the functions

Assign controller buttons to desired functions for the Logitech system

To map functions to buttons, you have to repeat the steps written in the previous section for each function you want to map (this is where the patience part kicks in). Step 5 is where you will substitute the code for the function you want. And step 6 is where you will press the button to which you want that function mapped. Below is a table of all the codes, associated functions, and the mapping that I decided to utilize. Feel free to use my mapping or devise your own.

Logitech functions mapped to XFINITY Remote
CodeFunctionMapping
44485
12229    
28357
61381
61125
60869
60613
62405
61893
44741
28613
29637
27845
12485
12997
61637
Power
Vol +
Vol -
Center +
Center -
Surround +  
Surround -
Sub +
Sub -
Mute
Direct
Optical
Coax
Effect
Settings
Test
Power
Vol +
Vol -
Up Arrow
Down Arrow
Left Arrow
Right Arrow
Ch +
Ch -
Mute
HD ZOOM
TV/VCR
Last
FAV
Menu
Info


Final Tweaks

To limit further confusion with the main volume button... you wan to program the controller so that no matter what mode it is in (CABLE, TV, or AUX), the main volume button will raise or lower volume on the Logitech system, not the TV itself. Trust me, this goes a LONG way to mitigate against confusion from users.

Lock volume control to AUX mode
  1. Press and hold SETUP until a red light flashes twice
  2. Enter code 9 9 3 (red light will flash twice)
  3. Press and release AUX (red light for selected device will flash twice)
Now, if you wanted to lock volume control to the TV, you would substitute TV for AUX in the above steps.

FANFARE!

And that's that! If you made it through, tap yourself on the back. While you're at it, get yourself a Klondike bar. You deserve it. Your housemates and family will be happy too! To some degree, heh heh. And bookmark this page! You never know when your cable box will go kaput, Comcast will come replace it, and give you a whole new controller... be ready!!!

Sources

Original post
Codes that almost worked
Setting the 11523 code