Total Pageviews

Sunday, October 09, 2011

How To Obtain The Day of Week Given a Date in Google Spreadsheets

UPDATE 2017-10-12:
As noted in the comments, there is an even much easier way to do this now!

=TEXT(A1,"ddd")

At some point Google updated the text function to take formatting parameters which makes this a cinch.

The old post from 2011-10-09 follows below and is a great introduction to the CHOOSE function. But don't use it for getting the day of week anymore!


Google Spreadsheets has a nifty function named CHOOSE which exhibits behavior like the switch statement programmers all know and love. Basically, it allows one to select an action/value based on some input. This is GREAT!

I needed to fill cells with the day of the week given a date. There isn't any built-in function that performs this task in Google Spreadsheets right now. But, we can solve this very easily using the CHOOSE function.
=CHOOSE( weekday(H1), "Sun", "Mon", "Tue", "Wed", "Thu", "Fri", "Sat")
This formula is very simple:

  1. The contents of cell H1 holds the date
  2. The function weekday converts that date to a number from 1 through 7 representing the day of the week (Sunday=1)
  3. This value, in turn, is then used by CHOOSE to select which value in the subsequent list to use in the current cell
  4. Voila
E... to the Z.

In this case, we are converting dates to days of the week in the format I wanted. Now we can start getting all fancy. Imagine, instead of days of the week, the list of possible values were different formulas to compute some result. The formula to use depends on the value inserted in the first input to CHOOSE.  However, remember that nothing is stopping even this first input from being yet another formula computing a specific result based on the data in particular cells. 

With this function, the possibilities are endless!

Reference: See the second comment on this blogpost

Thursday, September 29, 2011

How to Sign Off of Netflix on PS3

The answer will shock you.... it's basically the Konami code:
  1. Start up the Netflix App on your PS3
  2. Go to the instant queue (just scroll to it at the bottom)
  3. Input the following code sequence using your controller:
    1. Up Up
    2. Down Down
    3. Left Right
    4. Left Right
    5. Up Up Up Up  (this is the departure from the Konami code)
After doing this, a popup will emerge describing the account currently activated on the PS3 with an option to deactivate it.  And Voila.

Crazy......  and no joke, this does work.

Reference: comment by dayanna on this ps3 community thread

Wednesday, June 22, 2011

Google Spreadsheets Tips: Not Equals, Newlines, And More!

If you are like me, sometimes you just want to add a newline within a cell. And other times, you want to check whether item A is NOT EQUAL to item B within a formula. But dangit... how do you do it!? This entry will cover such tips and tricks as I learn more of them (filtering is pretty sweet too). Without further adieu:
  1. Google Spreadsheets Formula Documentation
  2. Not Equals
  3. Newline
  4. Filtering
  5. Give me the value or give me ZERO... no errors PLEASE!!!

That's the link to all the formulas available in google spreadsheets (hint: click on the title of this very section). It is a pain to find just going to google help (strange....). This first tip is golden! Now you know where the formula list is.
    Not Equals

    There are two ways to do not equals:
    1. Use the symbol: <>
    2. Use the function: NE()
    The first one can be used in calls like the following:
    • =IF(A2<>"SKIP","Fanfare!","--")
    • =SUMIF(B4:B8,"<>2")
    That first one will print "Fanfare!" in its cell if the contents of A2 is not equal to "SKIP". That second one will will sum the contents of the cells in the range B4 to B8 that are not equal to 2.

    Pretty sweet huh?

    Newline

    Found this one searching google help. Check out this answer.

    There are two ways to create a newline within a cell:
    1. Use: &CHAR(10)&
    2. Use shortcut: Ctrl+Enter
      (i.e., press and hold the ctrl key and then press the enter key)
    I typically use the second one.

    Filtering

    Filtering is pretty dang sweet. It allows you to select specific cells of one column, based on criteria against another column. And if you want to get even more crazy, you can add more column/criteria pairs. In fact, you can even do rows, or both columns AND rows (but your brain might explode... just sayin'.)

    Example:

          =2*sum( filter( C2:C40, C2:C40<>"#N/A") )

    This formula will sum all of the values in the column C from rows 2 through 40 where the value within that cell is not equal to #N/A... and then multiply the result by 2.  So if we had the following:

      C  
    2  4  
    3  2  
    4  #N/A  
    5  3  

    The answer would be 2*(4+2+3) = 2*9 = 18.

    What filter basically does is return the values for all cells in the first range where the corresponding cell in the criteria range meets the criteria.

    Let's look at another example:

          =2*sum( filter( C2:C40, C2:C40<>"#N/A", D2:D40<>3) )

    This formula will sum all of the values in the column C from rows 2 through 40 where the value within that cell is not equal to #N/A and the corresponding cells of column D from 2 through 40 is not equal to 3. The result is then multiplied by 2. So if we had the following:

      C    D  
    2  4    3  
    3  2    0  
    4  #N/A    2  
    5  3    9  


    The answer would be 2*(2+3) = 2*5 = 10. 

    Mull that one over a bit.  But yes, filter is bad @$$.

    Give me the value or give me ZERO... no errors PLEASE!!!

    Answer: N( IFERROR( value ) )

    This combination of functions is magical.  It will return 0 if whatever you are trying to do for value bombs big time. But, if it doesn't bomb, this combo will return value.

    Why would we want to do this? Check out the following data set:

      C    D    E  
    2  a    inc    3  
    3  b    inc    1  
    4  a    dec    -2  
    5  b    add    9  

    Okay, so we've got something identified by the letter "a" and something identified by the letter "b". We also have indicators that suggest incrementing (inc), decrementing (dec), and adding (add). In this data set, inc and add mean the same thing. So to get the total amount of a particular item in column C, we need to some the values in column E where the corresponding cells in column D equal inc or add.

    Whew..... got that?

    Let's take the item designated as "b". If we wanted to find the total amount of it, we need two sums:

    • sum of all rows in E corresponding to item "b" designated as inc
    • sum of all rows in E corresponding to item "b" designated as add

    So, we filter on column E where column C="b" and where column D="inc".  Then we filter again except change "inc" to "add".

          = sum( filter(!E:E,!C:C="b",!D:D="inc") )  + sum( filter(!E:E,!C:C="b",!D:D="add") )

    This will gives us the answer 9. Great! Now, if we do the same thing for "a", the answer will be #N/A. Why? Because there are no rows in the data set for item "a" designated as add. So the filter won't return anything, and sum will throw an error.  We don't actually care that there were no rows designated as add. In fact, we would just be happy if it returned 0.

    BAM! That's where N( IFERROR( value ) ) swoops in like Superman and saves the day (or like Deadpool with guns blasting). If we wrap each sum method in N( IFERROR( ) ), we will get the result of 3 for "a". WIN!

    There may be a simpler way. If you know it, holla at me.

    Tuesday, June 07, 2011

    When do Options Expire?

    This is a long time coming. I think I've had my reference articles opened in Chrome tabs for a year now (yeah, you read that correctly... one year). So, when do the financial instruments known as options expire? The answer isn't a simple one. It depends on what type of option we're talking about, and potentially on what underlying to which this instrument derives its value. This article aims to distill the answers in as concise a way as possible. Here goes:

    Option TypeOption FrequencyExpiration Last Trading OpportunitySettlement Reconciled Proviso
    Equity Weekly Friday Fri @ 16:00H Fri @ 16:00HFri @ 17:00H
    Equity Monthly Saturday following the third Friday of the monthFri @ 16:00H Fri @ 16:00HSat @ 17:00H
    Index (PM) Weekly FridayThu @ 16:00H Fri @ 16:00HFri @ 17:00H
    Index (PM) Monthly Saturday following the third Friday of the monthThu @ 16:00H Fri @ 16:00HSat @ 17:00H
    Index (AM) Weekly FridayThu @ 16:00H Fri @ AM Fri @ 17:00HSettlement computed once all opening prices of all underlyings that represent this index are recorded
    Index (AM) Monthly Saturday following the third Friday of the monthThu @ 16:00H Fri @ AM Sat @ 17:00HSettlement computed once all opening prices of all underlyings that represent this index are recorded
    *All times above are Eastern Standard Time (EST)

    Allowing the option to expire "worthless" is a bad idea if the price is anywhere near the strike. Due to settlement and reconciliation processes, the option you thought was out-of-the-money may actually end up being in-the-money (and vice-versa). This is particularly bad if you are unhedged in a short position or don't have the funds in an account where a long position is automatically exercised.

    Other Facts

    American Style Exercise: Options can be exercised anytime before expiration
    European Style Exercise: Options can only be exercised at expiration

    • When holidays occur, last trading dates and index settlements get pushed earlier one day (as expected)
    • Equity Options have American Style Exercise
    • Index Options have European Style Exercise -- some are American

    Sources

    Options Expiration and Exercise
    Options Expiration FAQ
    CBOE Glossary
    Options Don't Expire on Fridays
    What are the terms of Short-Term Options?

    Sunday, June 05, 2011

    How to Permanently Delete Images in iPhoto

    Did you know... iPhoto has it's own trash can!? Yup! Like you, I did not realize this fact. iPhoto does so many things under the hood, it's hard to know what exactly is going on. Did you know that if you do red-eye removal on a photo, a new copy of that photo is made? iPhoto wants to make sure the original photo stays intact so that we, the users, may always have access to it. Okay, let's get on with the purpose of this post.

    Album:
    • Is a "view" on the photos in your library
    • Think of albums as "Labels" in GMail
      • many labels (albums) can point to the same e-mail (photo)
      • you can create as many labels (albums) as you want
      • deleting a photo from an album is akin to removing a GMail label from an e-mail -- that e-mail (photo) is simply removed from that view (label/album), but the e-mail still exists in your library
      • deleting a label (album) does not delete your e-mails (photos); it only removes the association
    Library:
    • all of your photos
    • deleting a photo in your library moves it to iPhoto's trash -- i.e., it still exists

    So far, I hope the distinctions have been clear between deleting a photo in an album versus deleting a photo in your library. Once you have deleted a photo in your library (and it has been moved to the trash), you must EMPTY THE TRASH to permanently remove the photo from your computer. There are three ways to do this:

    1. Use the main menu bar


    a) click on "iPhoto" in the main menu
    b) click on "Empty Trash"
    c) FANFARE!!!


    2. Use the trash icon


    a) look under "Recent"
    b) right click on "Trash"
    c) select "Empty Trash"
    d) FANFARE!!!


    (Note: the icon will appear under "Recent" if you've recently viewed/emptied trash)


    3. Use a shortcut


    a) make sure you haven't selected any images anywhere
    b) press shift-command-delete


    Saturday, May 07, 2011

    My Country Music Experiment

    Country music gets a gigantic load of hate, primarily from us city dwellers. And I can't count myself outside of that hating crowd! At least... up until I finally made good on my word to give country a chance. It must have been six or so years ago when I realized, "Man, you've been broadening your music tastes across the board... and you STILL haven't given country a fair shot!" And there that thought lingered -- in the distant recesses of my mind.

    Then, maybe about two months ago, I got a tip that the NCAA Wrestling Championships were on ESPN2. Jumping out of my seat I rushed to that sweet HDTV and frantically flipped through hunting for the channel. Soon it dawned on me... we don't have that channel (dag...NAMIT!). The channel I landed on was some country music channel. I thought, "Meh, might as well leave it on in the background. I have been planning to give country a shot for who knows how long now." So began my experiment...

    The majority of the music I heard, I did not like (no shocker there). But surprisingly, there were quite a few I did like! I mean, I expected there to be close to zero; instead there were more like ten! So, on to the next phase. PANDORA TIME!  I seeded a new station with three tracks:
    1. My Kinda Party by Jason Aldean
    2. Save A Horse [Ride A Cowboy] by Big & Rich
    3. This by Darius Rucker
    Here is a YouTube video for My Kinda Party:


    Two months and numerous thumbed down tracks later, I'm still digging this station! The seeds worked great, and cutthroat curating is keeping it on point. What I've gleaned is that country nowadays is not like the country of before (and that country music fans are EXTREMELY stoked about bringing new people into the fold). Technically, I hear that the stuff I seem to have fallen for is country "pop" music. And, it is HARD to stay seated when the good stuff comes on!

    Now if Pandora didn't exist, there's no way I would have really followed through on giving country music a chance. But Pandora makes it way easy. All I had to do was seed and thumb up or down the tracks it began playing. All the while, the algorithm powering Pandora gets smarter, converging on the type of country striking my fancy and playing more and more aligned picks. It's great! And if you haven't started using Pandora yet... get on it!

    My experiment has revealed so far that country music pretty much revolves around the following:
    1. Keepin' it real
    2. Embracing your humanness
    3. Complimenting a woman every chance you get
    4. Standing tall for what you believe in (don't back down)
    You can't go wrong with that! All four are realized in various styles of play. I'm a fan of the faster, more upbeat styles with some serious drum beats. The style makes it hard for a brother to remain seated. The music is MAD enjoyable. The storytelling is so genuine and somewhat innocent you can't help but get sucked in, and not to mention unintentionally HILARIOUS in quite a few songs. The music definitely about living life to the max and being real while pursuing that endeavor... ALL IN PEOPLE. You gotta have a great time and make the most of life, and you gotta do it with those whom you are close. In addition, let's not forget moments of pure chillin'.

    And maaaaan, the women must feel like they're on cloud 9 all the time. For real! In nearly every genre of music women are talked up. But in the country songs I dig, women are pretty much (all in a good way) the most precious, beautiful, wild, dangerous, independent, exotic, amazing entities to ever exist. In addition, the lady is complimented with such clever use of words it reminded me of the days of good  R&B where you knew the artists were singing about some intimate details but done in such a dressed up way it was straight beautiful and beyond smooth.

    So, country music gets my thumbs up. I'm all about music that is great fun, gets you moving, and tells a great story or hits on real topics. Music lately has been moving away from that, so this was a refreshing breath of air and vitality. Give country a try! And use Pandora to do it -- makes finding your niche a cinch.

    In addition to My Kinda Party mentioned earlier, here's a list of some of my current favorites with a bulleted shortlist below the widget. Click on the widget to see the longer list and play samples.

    Friday, April 01, 2011

    Integrating Eclipse, Subversion, and JIRA Studio on a Mac

    Another one for my fellow fully integrated development environment junkies. Continuing on with the mantra, "My tools should work for me, not the other way around," this post will discuss how to integrate Subversion and JIRA Studio into Eclipse 3.6 Helios in order to facilitate development and streamline workflow. This was done on a Mac running OS X version 10.6.7.

    Some background, JIRA Studio is the hosted version of the JIRA issue tracking and project management suite. Of all the issue tracking tools I've used (Bugzilla, Trac, Redmine, and others), JIRA handily surpasses them all. The Studio instance also integrates many of Atlassian's other products into one integrated suite that is beyond sweet (no pun intended).

    Alright, let's get on to it!

    Installing/Updating Eclipse

    Download the latest eclipse installation per your requirements.  I installed the OS X 64-Bit Java EE version which can be found here:
    Save the file and move to wherever you want to extract it (/Applications/eclipse/ is not a bad idea).
    • gunzip <eclipse-version.tar.gz>
    • tar -xvf <eclipse-version.tar>
    These commands will extract the contents into a folder likely named eclipse. I suggest renaming that folder to be representative of the installation.
    • mv eclipse eclipse-jee-helios-64
    Launch Eclipse and select a workspace.

    If you were using an older version of Eclipse, most of your workspace configurations are contained within the workspace and will be carried over. You will, however, need to re-download any plugins. Most plugins would need to be updated anyway due to the new version of Eclipse. Do this by going to "Help" on the main Eclipse menu bar and selecting "Eclipse Marketplace" or "Install New Software". With the latter, you will need to add update sites manually.

    Installing JavaHL 
    (Required for Subclipse)

    In order for Subclipse to work, it requires JavaHL (Java bindings to Subversion) to be installed. Visit http://subclipse.tigris.org/wiki/JavaHL for more background. I've come across two ways to realize this step:
    1. Via MacPorts
    2. Via CollabNet
    The former avoids the off putting user registration/verification step required by the latter. But if the target system does not already have MacPorts installed, then a rather involved process will follow if using option 1.  Otherwise, if MacPorts is already installed, option 1 is likely the better alternative with regards to keeping the target system updated and current.

    Via Option 1:
    However, the JavaHL Subclipse Wiki Entry does indicate that using MacPorts may result in a loading error from Subclipse if the target system is utilizing the native 64-bit JVM provided on Snow Leopard. The wiki claims this is due to MacPorts compiling the JavaHL packages as 32-bit binaries.  Option 2 includes binaries for both 32-bit and 64-bit architectures and thus circumvents this issue.

    Via Option 2:

    Note that after installation, we will augment the path such that this new Subversion installation is the one first found by any callers.  In other words, the native Subversion binaries of OS X will still remain, just frog jumped.
    1. Go to http://www.open.collab.net/downloads/community/
    2. If don't already have an account, you will have to create one (it's free).
    3. Download the Universal Subversion binaries for your version of OS X.
    4. Double-click on the .dmg file.
    5. Double-click on the package that appears and follow instructions to complete installation (not different from typical installation procedures of .dmg distributions).
    6. Issue the following command in a terminal window to frog jump these binaries in front of the native OS X Subversion installation:
      • export PATH=/opt/subversion/bin:$PATH
    Both of the following items can be installed via the Eclipse Marketplace.  However, you have less control over the version you want to install.  So, the following the descriptions utilize the non-marketplace method.  This involves adding a plugin's "update site" to your Eclipse installation.

    Installing Subclipse

    It is TREMENDOUSLY important that you install the version of Subclipse matching your version of Subversion.  In addition, if you plan on utilizing multiple Subversion tools to interact with your local copy of the repository, all should be using the same version.

    The Subclipse update sites can be found on the Tigris site.  I've listed a couple here for your convenience:
    • http://subclipse.tigris.org/update_1.6.x   Subversion 1.6.x
    • http://subclipse.tigris.org/update_1.4.x   Subversion 1.5.x

    Add the update site to Eclipse:
    1. Click on "Help" on the main Eclipse menu bar
    2. Select "Install New Software"
    3. Click on the "Add" button on the top right of the dialogue window
    4. Enter an optional name like "Subclipse 1.6.x" and enter the 1.6.x update site (listed above) in the "location" text field
    5. Click "Ok"
    6. Now select the update site from the menu and click on next.
    You will see several items appear with check boxes to select software.

    You can select everything, or just the items you need.  Make sure that anything labeled "required" is checked.  Items having a dimmed connector icon are already installed and need not be checked.
    1. Click next and keep on following the instructions and accepting the license agreements
    2. After installation completes, opt to restart Eclipse
    Check that Subclipse operates with JavaHL: 
    1. Go to "Eclipse > Preferences..."
    2. Expand "Team"
    3. Click on "SVN"
    If there is no error from clicking on "SVN", then aside from your personal preferences the installation and configuration should be complete.

    Installing the Atlassian Eclipse Connector

    The following are the connector's update sites:
    • http://update.atlassian.com/atlassian-eclipse-plugin/e3.6
    • http://update.atlassian.com/atlassian-eclipse-plugin/e3.5
    Use the link below if you want the connector that still includes Crucible and Fisheye support (works for both Eclipse 3.5 and 3.6):
    • http://update.atlassian.com/atlassian-eclipse-plugin/2.3.0/e3.5
    Follow the same procedure as outlined in "Installing Subclipse" to get the Atlassian Eclipse Connector plugin installed. Again, opt to restart Eclipse after installation.

    Connect Atlassian Eclipse Connector to JIRA
    1. Launch Eclipse
    2. If you have the default workbench layout in Eclipse, then a "Task" panel should appear in the upper left
    3. Clicking on the new task icon on this panel will bring up the following menu:
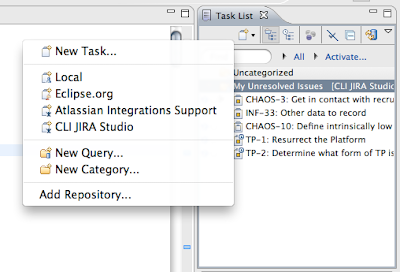
    4. Click on add repository; the following dialogue should appear:
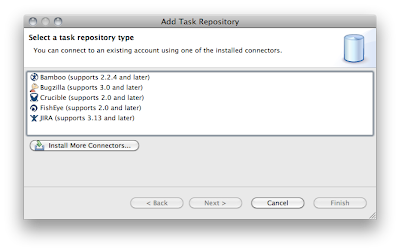
    5. Select JIRA
    6. Augment options if desired
    7. Verify the configuration
    Once the repository is all set, you'll need to add queries to get your tasks to appear in the task window. Using the same steps we walked through to reach the "Add Repository" selection, we can reach the "New Query" selection. The rest should be self-explanatory.

    Hope this helps!

    Monday, March 28, 2011

    VMware Fusion + Ubuntu + Shared Folders

    For you crazies out there trying to circumvent lockouts... you may have endeavored to create a development environment utilizing multiple technologies to facilitate your need. Case in point:


    This setup allows me to run various programs on my local system when I'm not on campus. However, the tiny gotchas in setting up the environment have serious bite! The setup involves VMware Fusion on a Mac running an Ubuntu installation in a virtual machine and sharing folders between the host operating system (OS X) and the guest (Ubuntu).  My Ubuntu installation is actually augmented as a Debathena station.

    This post will only cover getting around the problems encountered when sharing folders between the Mac and the Ubuntu Virtual Machine running concurrently.  More specifically, making sure that it can be seen from the guest and streamlining to mitigate against the risk of system updates breaking the shared folders functionality. Creating the whole environment from scratch might be the topic of another post. Anyway, I found a mechanism so that shared folders work, but it does require a manual operation whenever the virtual machine is launched.

    The problem revolves around VMware Tools. VMware tools provides extra features that allow for a more seamless operation between the host and guest operating systems such that the line splitting the two is blurred. This includes copy/paste functionality, shared folders, and more. However, installing VMware tools is quite a process.  There are a few ways to do it:
    1. using the open-vm-tools package provided by Ubuntu
    2. using packages.vmware.com from VMware itself
    3. manually via the VMware host you are running
    Of these three, method 2 will allow you to utilize the standard package manager operations provided by the Ubuntu operating system to manage updates. And that... is priceless. When I first created this development environment, I went with option 3. Everything worked beautifully, although I had to use the 32-bit 10.04 Lucid version of Ubuntu instead of the 64-bit 10.10 version after hitting several road bumps. Then at some future date, I had to install a slew of updates...  this is when vmware tools got broken and, more specifically, shared folders.

    Go with option 2....

    Installation via Option 2


    The following sites provide pretty good instruction on how to get vmware tools installed:
    Unfortunately, it will take some back and forth between the two guides to fully complete the installation as the former is missing some steps mentioned in the latter. Here is my abridged version (actual command line commands will be in bold italics):
    1. (optional) if vmware tools is already installed via option 3, it must be uninstalled:
      1. sudo vmware-uninstall-tools.pl 
    2. create a directory to store some keys (doesn't matter where)
    3. navigate to that directory
    4. wget http://packages.vmware.com/tools/keys/VMWARE-PACKAGING-GPG-DSA-KEY.pub
    5. wget http://packages.vmware.com/tools/keys/VMWARE-PACKAGING-GPG-RSA-KEY.pub
    6. wget http://packages.vmware.com/tools/VMWARE-PACKAGING-GPG-KEY.pub
    7. sudo apt-key add *KEY.pub
    8. cd /etc/apt/sources.list.d
    9. sudo emacs -nw vmware-tools.list
    10. add the following line to that file followed by a newline:
      1. deb http://packages.vmware.com/tools/esx/4.1latest/ubuntu lucid main restricted
    11. ctrl+x ctrl+s (saves the file)
    12. ctrl+x ctrl+c (exits emacs)
    13. sudo apt-get update
    14. sudo apt-get install vmware-open-vm-tools-kmod-source
    15. sudo module-assistant prepare
    16. sudo module-assistant build vmware-open-vm-tools-kmod-source
    17. sudo module-assistant install vmware-open-vm-tools-kmod
    18. sudo apt-get install vmware-open-vm-tools
    There is a chance that step 14 will generate an error in the vain of, "I don't know what file you are talking about...."  If this happens, something likely went wrong in steps 9-12.  Make sure there is a new line at the end of the file.

    At some point during those steps, a reboot or two will likely be required. 

    Installation Verification


    After all these steps, it is wise to verify the installation.  According to the VMware documentation, this can be done by running the following command:
    • /etc/init.d/vmware-tools status
    In this status, you want to verify that "vmware-guestd" is running (for ESX releases prior to 4.1) or "vmtoolsd" is running (for ESX releases 4.1 and later).  The documentation also says to check that certain kernel modules are running using the /sbin/lsmod command. See page 29 under "Verify VMware Tools installation" in the documentation for more details.

    Verifying Shared Folders


    If you desire to share folders on your OS X side with the Ubuntu guest, a few extra steps will be required.  
    1. On the VMware Fusion menu bar, select "Virtual Machine"
    2. Click on "Shared Folders"
    3. If a shared folder hasn't yet been created, select "Add a Shared Folder"
      1. When completed return to the "Virtual Machine > Shared Folders" menu option 
    4. Select "Open Shared Folders Settings..." and verify your desired settings
    Now that a shared folder is verified to exist on the VMware Fusion software, check that it can be seen within the Ubuntu guest (it likely won't):
    1. Open a terminal window
    2. ls /mnt/hgfs/
    If your shared folder does not get listed, it means Ubuntu cannot see it.  Return to the VMware Fusion menu bar and do the following:
    1. Select "Virtual Machine > Shared Folders > Turn Shared Folders Off"
    2. Select "Virtual Machine > Shared Folders > Turn Shared Folders On"
    That's right, simply toggle shared folders off and on. Return to the terminal window on the Ubuntu guest and run the same command again:  
    • ls /mnt/hgfs/
    This time, your shared folder should get listed.  And off you go.  

    You should now be able to ensure vmware tools is always updated via Ubuntu's package manager. However, every time the Ubuntu guest is relaunched, the shared folders toggling trick will need to be executed to ensure the guest can see the shared folders.

    Run along now, hope this helps!