Total Pageviews

Friday, April 01, 2011

Integrating Eclipse, Subversion, and JIRA Studio on a Mac

Another one for my fellow fully integrated development environment junkies. Continuing on with the mantra, "My tools should work for me, not the other way around," this post will discuss how to integrate Subversion and JIRA Studio into Eclipse 3.6 Helios in order to facilitate development and streamline workflow. This was done on a Mac running OS X version 10.6.7.

Some background, JIRA Studio is the hosted version of the JIRA issue tracking and project management suite. Of all the issue tracking tools I've used (Bugzilla, Trac, Redmine, and others), JIRA handily surpasses them all. The Studio instance also integrates many of Atlassian's other products into one integrated suite that is beyond sweet (no pun intended).

Alright, let's get on to it!

Installing/Updating Eclipse

Download the latest eclipse installation per your requirements.  I installed the OS X 64-Bit Java EE version which can be found here:
Save the file and move to wherever you want to extract it (/Applications/eclipse/ is not a bad idea).
  • gunzip <eclipse-version.tar.gz>
  • tar -xvf <eclipse-version.tar>
These commands will extract the contents into a folder likely named eclipse. I suggest renaming that folder to be representative of the installation.
  • mv eclipse eclipse-jee-helios-64
Launch Eclipse and select a workspace.

If you were using an older version of Eclipse, most of your workspace configurations are contained within the workspace and will be carried over. You will, however, need to re-download any plugins. Most plugins would need to be updated anyway due to the new version of Eclipse. Do this by going to "Help" on the main Eclipse menu bar and selecting "Eclipse Marketplace" or "Install New Software". With the latter, you will need to add update sites manually.

Installing JavaHL 
(Required for Subclipse)

In order for Subclipse to work, it requires JavaHL (Java bindings to Subversion) to be installed. Visit http://subclipse.tigris.org/wiki/JavaHL for more background. I've come across two ways to realize this step:
  1. Via MacPorts
  2. Via CollabNet
The former avoids the off putting user registration/verification step required by the latter. But if the target system does not already have MacPorts installed, then a rather involved process will follow if using option 1.  Otherwise, if MacPorts is already installed, option 1 is likely the better alternative with regards to keeping the target system updated and current.

Via Option 1:
However, the JavaHL Subclipse Wiki Entry does indicate that using MacPorts may result in a loading error from Subclipse if the target system is utilizing the native 64-bit JVM provided on Snow Leopard. The wiki claims this is due to MacPorts compiling the JavaHL packages as 32-bit binaries.  Option 2 includes binaries for both 32-bit and 64-bit architectures and thus circumvents this issue.

Via Option 2:

Note that after installation, we will augment the path such that this new Subversion installation is the one first found by any callers.  In other words, the native Subversion binaries of OS X will still remain, just frog jumped.
  1. Go to http://www.open.collab.net/downloads/community/
  2. If don't already have an account, you will have to create one (it's free).
  3. Download the Universal Subversion binaries for your version of OS X.
  4. Double-click on the .dmg file.
  5. Double-click on the package that appears and follow instructions to complete installation (not different from typical installation procedures of .dmg distributions).
  6. Issue the following command in a terminal window to frog jump these binaries in front of the native OS X Subversion installation:
    • export PATH=/opt/subversion/bin:$PATH
Both of the following items can be installed via the Eclipse Marketplace.  However, you have less control over the version you want to install.  So, the following the descriptions utilize the non-marketplace method.  This involves adding a plugin's "update site" to your Eclipse installation.

Installing Subclipse

It is TREMENDOUSLY important that you install the version of Subclipse matching your version of Subversion.  In addition, if you plan on utilizing multiple Subversion tools to interact with your local copy of the repository, all should be using the same version.

The Subclipse update sites can be found on the Tigris site.  I've listed a couple here for your convenience:
  • http://subclipse.tigris.org/update_1.6.x   Subversion 1.6.x
  • http://subclipse.tigris.org/update_1.4.x   Subversion 1.5.x

Add the update site to Eclipse:
  1. Click on "Help" on the main Eclipse menu bar
  2. Select "Install New Software"
  3. Click on the "Add" button on the top right of the dialogue window
  4. Enter an optional name like "Subclipse 1.6.x" and enter the 1.6.x update site (listed above) in the "location" text field
  5. Click "Ok"
  6. Now select the update site from the menu and click on next.
You will see several items appear with check boxes to select software.

You can select everything, or just the items you need.  Make sure that anything labeled "required" is checked.  Items having a dimmed connector icon are already installed and need not be checked.
  1. Click next and keep on following the instructions and accepting the license agreements
  2. After installation completes, opt to restart Eclipse
Check that Subclipse operates with JavaHL: 
  1. Go to "Eclipse > Preferences..."
  2. Expand "Team"
  3. Click on "SVN"
If there is no error from clicking on "SVN", then aside from your personal preferences the installation and configuration should be complete.

Installing the Atlassian Eclipse Connector

The following are the connector's update sites:
  • http://update.atlassian.com/atlassian-eclipse-plugin/e3.6
  • http://update.atlassian.com/atlassian-eclipse-plugin/e3.5
Use the link below if you want the connector that still includes Crucible and Fisheye support (works for both Eclipse 3.5 and 3.6):
  • http://update.atlassian.com/atlassian-eclipse-plugin/2.3.0/e3.5
Follow the same procedure as outlined in "Installing Subclipse" to get the Atlassian Eclipse Connector plugin installed. Again, opt to restart Eclipse after installation.

Connect Atlassian Eclipse Connector to JIRA
  1. Launch Eclipse
  2. If you have the default workbench layout in Eclipse, then a "Task" panel should appear in the upper left
  3. Clicking on the new task icon on this panel will bring up the following menu:
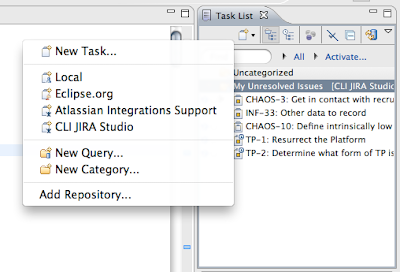
  4. Click on add repository; the following dialogue should appear:
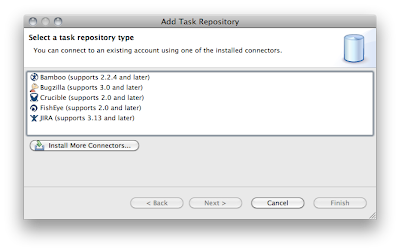
  5. Select JIRA
  6. Augment options if desired
  7. Verify the configuration
Once the repository is all set, you'll need to add queries to get your tasks to appear in the task window. Using the same steps we walked through to reach the "Add Repository" selection, we can reach the "New Query" selection. The rest should be self-explanatory.

Hope this helps!

Monday, March 28, 2011

VMware Fusion + Ubuntu + Shared Folders

For you crazies out there trying to circumvent lockouts... you may have endeavored to create a development environment utilizing multiple technologies to facilitate your need. Case in point:


This setup allows me to run various programs on my local system when I'm not on campus. However, the tiny gotchas in setting up the environment have serious bite! The setup involves VMware Fusion on a Mac running an Ubuntu installation in a virtual machine and sharing folders between the host operating system (OS X) and the guest (Ubuntu).  My Ubuntu installation is actually augmented as a Debathena station.

This post will only cover getting around the problems encountered when sharing folders between the Mac and the Ubuntu Virtual Machine running concurrently.  More specifically, making sure that it can be seen from the guest and streamlining to mitigate against the risk of system updates breaking the shared folders functionality. Creating the whole environment from scratch might be the topic of another post. Anyway, I found a mechanism so that shared folders work, but it does require a manual operation whenever the virtual machine is launched.

The problem revolves around VMware Tools. VMware tools provides extra features that allow for a more seamless operation between the host and guest operating systems such that the line splitting the two is blurred. This includes copy/paste functionality, shared folders, and more. However, installing VMware tools is quite a process.  There are a few ways to do it:
  1. using the open-vm-tools package provided by Ubuntu
  2. using packages.vmware.com from VMware itself
  3. manually via the VMware host you are running
Of these three, method 2 will allow you to utilize the standard package manager operations provided by the Ubuntu operating system to manage updates. And that... is priceless. When I first created this development environment, I went with option 3. Everything worked beautifully, although I had to use the 32-bit 10.04 Lucid version of Ubuntu instead of the 64-bit 10.10 version after hitting several road bumps. Then at some future date, I had to install a slew of updates...  this is when vmware tools got broken and, more specifically, shared folders.

Go with option 2....

Installation via Option 2


The following sites provide pretty good instruction on how to get vmware tools installed:
Unfortunately, it will take some back and forth between the two guides to fully complete the installation as the former is missing some steps mentioned in the latter. Here is my abridged version (actual command line commands will be in bold italics):
  1. (optional) if vmware tools is already installed via option 3, it must be uninstalled:
    1. sudo vmware-uninstall-tools.pl 
  2. create a directory to store some keys (doesn't matter where)
  3. navigate to that directory
  4. wget http://packages.vmware.com/tools/keys/VMWARE-PACKAGING-GPG-DSA-KEY.pub
  5. wget http://packages.vmware.com/tools/keys/VMWARE-PACKAGING-GPG-RSA-KEY.pub
  6. wget http://packages.vmware.com/tools/VMWARE-PACKAGING-GPG-KEY.pub
  7. sudo apt-key add *KEY.pub
  8. cd /etc/apt/sources.list.d
  9. sudo emacs -nw vmware-tools.list
  10. add the following line to that file followed by a newline:
    1. deb http://packages.vmware.com/tools/esx/4.1latest/ubuntu lucid main restricted
  11. ctrl+x ctrl+s (saves the file)
  12. ctrl+x ctrl+c (exits emacs)
  13. sudo apt-get update
  14. sudo apt-get install vmware-open-vm-tools-kmod-source
  15. sudo module-assistant prepare
  16. sudo module-assistant build vmware-open-vm-tools-kmod-source
  17. sudo module-assistant install vmware-open-vm-tools-kmod
  18. sudo apt-get install vmware-open-vm-tools
There is a chance that step 14 will generate an error in the vain of, "I don't know what file you are talking about...."  If this happens, something likely went wrong in steps 9-12.  Make sure there is a new line at the end of the file.

At some point during those steps, a reboot or two will likely be required. 

Installation Verification


After all these steps, it is wise to verify the installation.  According to the VMware documentation, this can be done by running the following command:
  • /etc/init.d/vmware-tools status
In this status, you want to verify that "vmware-guestd" is running (for ESX releases prior to 4.1) or "vmtoolsd" is running (for ESX releases 4.1 and later).  The documentation also says to check that certain kernel modules are running using the /sbin/lsmod command. See page 29 under "Verify VMware Tools installation" in the documentation for more details.

Verifying Shared Folders


If you desire to share folders on your OS X side with the Ubuntu guest, a few extra steps will be required.  
  1. On the VMware Fusion menu bar, select "Virtual Machine"
  2. Click on "Shared Folders"
  3. If a shared folder hasn't yet been created, select "Add a Shared Folder"
    1. When completed return to the "Virtual Machine > Shared Folders" menu option 
  4. Select "Open Shared Folders Settings..." and verify your desired settings
Now that a shared folder is verified to exist on the VMware Fusion software, check that it can be seen within the Ubuntu guest (it likely won't):
  1. Open a terminal window
  2. ls /mnt/hgfs/
If your shared folder does not get listed, it means Ubuntu cannot see it.  Return to the VMware Fusion menu bar and do the following:
  1. Select "Virtual Machine > Shared Folders > Turn Shared Folders Off"
  2. Select "Virtual Machine > Shared Folders > Turn Shared Folders On"
That's right, simply toggle shared folders off and on. Return to the terminal window on the Ubuntu guest and run the same command again:  
  • ls /mnt/hgfs/
This time, your shared folder should get listed.  And off you go.  

You should now be able to ensure vmware tools is always updated via Ubuntu's package manager. However, every time the Ubuntu guest is relaunched, the shared folders toggling trick will need to be executed to ensure the guest can see the shared folders.

Run along now, hope this helps!